Wedge Salad

Well, it’s been a while again!  Sorry!  I would absolutely love to be here every single day sharing a recipe with you.  But unfortunately, I can’t seem to find a way to make a day have 87 hours in it instead of 24.  Wouldn’t that be nice!? 

So it’s Labor Day weekend………and I’m off for a few days.  WOO HOO!  That gives me a few minutes to sit here and enjoy sharing a recipe! 

Once in a while, I crave a good steak.  And for the past few days, it’s been “once in a while!”  So yesterday morning, I set off in search of a good steak!  Turns out one of our little podunk grocery stores, which still uses a real, honest-to-goodness butcher,  had New York Strip Steaks on sale at a way honkin’ insane price!  $5.98 a pound as opposed to around $9-12 a pound they usually are.  So I scooped some of those bad boys up and trotted to the house with them! 

But you can’t just have steak!  You’ve got to have something to go with it!  So Unk decided we needed to have a Wedge Salad.  I love to make Wedge Salad.  And honestly, that was what I was already thinking of doing before I even asked anybody else what we should have with the steaks!  So Wedge Salad, coming right up!

What is Wedge Salad?  Well, it’s um, a bunch of stuff cut into wedges!  It’s simple really!  Put whatever you like in it that you can cut into a wedge.

You start with a head of iceberg lettuce.  Yes, I KNOW it has absolutely no nutritional value whatsoever.  But you know what?  You can’t cut any of those fancy fru-fru lettuces and greens into nifty wedges.  You just can’t.  So work with me here!  Go buy some funky no-nutritional-value iceberg lettuce and just make the salad!  It’s good!  I promise!

Cut the lettuce head in half and cut the core out.  Then cut each half into 4 wedges.  Place those on a large platter.  Then just start adding wedges of whatever you feel like adding.  Yesterday’s Wedge Salad at my house got wedges of tomatoes, baby carrots, cucumbers, marble cheese and pepper jack cheese.  Just arrange the various wedges all around and on your lettuce wedges.  When everything was arranged, I added some chopped up bacon and some whole green onions to the top. 

It looks a little something like this:


Then I made some “homemade” Ranch dressing.  I started with a packet of Hidden Valley Ranch dressing mix, but I seriously doctored it.  I added fresh cracked pepper, fresh minced garlic and fresh chives from my herb garden out back. 

It’s nothing fancy.  But it sure is tasty!  You can do with it whatever you like.  I was going to add some wedges of cantaloupe too, but they’re just a little too spendy right now.  So no ‘loupe this time.  Wedges of pineapple or honeydew or any number of things would be delish too!

Give it a whirl!  See how you like it!  And I’ll try to come back soon with another try-me!

Grilled Chicken and Mozzarella Panini

Do y’all Panini?  In case you haven’t heard of them or seen them or tasted them, it’s basically just a grilled sandwich, grilled with a fancy-named machine.  Me?  I don’t have a fancy panini machine.  I’ve got a knock-off of a George Foreman grill from probably 10 years ago when those GF grills were all the rage.  That’s what I use.  But it’s effective, so who cares right?

I sorta started panini’ing by accident.  I just thought I’d give it a whirl and see whether I could make a panini with my pitiful little GF knock-off grill.  Lo and behold, it worked!  Now, my family thinks paninis are the best thing in the world! 

So my last foreign exchange student is in town visiting.  And while I didn’t make paninis during her time with our family, I made her one on one of her first visits back.  Now that’s one of her favorite things I ever made!  A sandwich, of all things!

So when she first got here a couple weeks ago, I did paninis one night for dinner.  I started out by making the bread dough.  I wanted something that would compliment that flavors I planned to put on the panini.  And couldn’t find any bread that worked, so I decided to make it myself.  I made a Sun-Dried and Basil Tomato Foccacia bread.  Sounds fancy, but it was easy!  Here’s how I made it:

Sun-Dried Tomato and Basil Foccacia Bread

*  4 Tbsp. extra virgin olive oil

*  1 tsp. salt

*  minced garlic and lots of it!

*  15 fresh basil leaves, chopped

*  1/2 cup sun-dried tomatoes (packed in oil, drained and rinsed, then chopped small)

*  10-12 oz. warm water

*  4 cups bread flour or all-purpose flour

*  1 cup very finely grated parmesan cheese

*  1 pkg. yeast

Pour oil, water and salt in Kitchen-Aid mixer bowl.  Add garlic and flour.  Sprinkle yeast on top.  Knead with dough hook about 5 minutes or until well combined.  Add basil, tomatoes and cheese and knead until they are incorporated into the dough.  Divide dough into 8 buns, shaping into ovals. 

***NOTE:  I used my Pampered Chef stone bar pan for this.  I laid the dough out on the stone, then brushed the tops with olive oil, covered with a dish towel and set them on my deck to rise. 

Bake in a preheated 350° oven for 25-30 minutes, misting with water every 5 minutes until done.  This keeps the outside of the dough from being hard.  Set aside to cool.

Before I grilled the chicken for the paninis, I marinated it.  I wanted it to have lots of flavor!  I used a small bottle of Italian dressing and 1 pkg. of dry Italian dressing mix poured over boneless, skinless chicken breasts.  I let them marinate about 4 hours before grilling them. 

The “sauce” for the panini was a knock-off of a dipping sauce served at Buca di Beppo, one of our very favorite Italian restaurants.  They have this pesto dipping sauce for one of their appetizers that’s just to die for.  My sauce wasn’t nearly as good, but it worked.

Pesto Mayo

*  2 cups mayo (good quality ONLY!)

*  1 tube pesto

*  4 cloves garlic, minced very fine

Mix together until well blended.  This stuff would be good on DIRT!

Now you’re ready to start building your paninis!

Here’s the Sun-Dried Tomato & Basil Foccacia Bread.  Please excuse the photo.  It’s just not all that focused.  Sorry!  But trust me, the bread was WAY honkin’ better than the photo!

Split each piece of bread and spread the Pesto Mayo on each side.

Add a handful of Argula or whatever green you might like on each bread half.  The arugula is a little spicy and peppery which really complimented the other toppings!

Now add slices of Roma tomato on top of the arugula.  I didn’t get a picture, but I added fresh-cracked pepper on top of the tomatoes.  I LOVE fresh-cracked pepper!

Oh my!  Now here comes the good part!  Add slices of fresh mozzarella cheese on each sandwich.  I implore you, PLEASE, PLEASE, PLEASE, don’t use anything but fresh mozzarella cheese.  Go to the deli section of your market and look for it.  Sometimes it will look like a little ball.  Sometimes it will be in a longer package.  Fresh mozzarella is very soft.  And there is absolutely NO comparison between fresh mozzarella and that stuff you get in the regular dairy section of the store.  I promise!  Give it a try!  You won’t be sorry!


Top the mozzarella with sliced grill chicken. 

HOO BOY!  Just look at that!  It’s ready to hit the panini machine or the George Foreman or the griddle or whatever you want to use.  You could  even do this on the outside grill if you put something heavy on top of the sandwich to mash it down, then flip and grill on the other side.

And this is what you end up with!  Awesomeness on a plate!  This thing was absolutely delectable!  I served it with a Caprese Salad to tie in the tomato/mozzarella/basil theme and an Orzo Salad.  I’ll share that one with you another day!

Enjoy!  Now go panini and report back!

Zucchini Gratin

So I mentioned that there are three little French girls running the hillsides around these parts right now.  I promised them I’d make their favorite veggies for dinner last night.  One’s favorite was potatoes so I made Springs Smashed Spuds for her.  I’ve shared those here with you before.  The other’s favorites were tomatoes and zucchini.  So I did the Oven-Fried Green Tomatoes that I’ve shared with you and I invented a new zucchini dish because…………….well, because I just did. 

I’m not a huge fan of zucchini.  I can eat it.  But I don’t love it.  I don’t ever wake up in the morning and say, “Hooooooooo boy!  I sure got me a hankerin’ for some zukes!”  Nope, not so much.  So I struggled a little bit with figuring out what to make other than just frying it like I would yellow crookneck squash, which she’s already tried while visiting. 

So my little head began to spin and out popped Zucchini Gratin.  I basically made Au Gratin Potatoes, but used zukes instead.

Zucchini Gratin

*  4 zucchini, sliced thin

*  1 large onion, sliced thin

*  2 cups fresh parmesan cheese, grated

*  1.5 cups half and half

*  1 cup flour

*  fresh basil and garlic to taste

*  Jane’s Krazy Mixed Up Salt

Spray a baking dish with non-stick cooking spray.  Layer 1/3 of the zucchini in the bottom of the dish, top with 1/3 the onion slices.  Sprinkle liberally with Jane’s Krazy Salt.  Sprinkle with fresh basil (chiffonade the basil—if you don’t know what that is, lay each leaf on top of each other in a stack.  Roll the leaves into a “log.”  Slice very thin strips off the “log”.  VOILA!  Chiffonade!) and garlic.  Sprinkle with flour and cheese.  Repeat each layer until you get to the top.  If you want a more “firm” dish, add more flour and less half and half.  Bake in a preheated 350° oven for 1 hour or until zucchini is tender.  Top with additional parmesan cheese if desired.  Or top with Italian-flavored Panko crumbs.  Either way would be wonderful.  I honestly didn’t think of the panko when I made this yesterday or I would’ve done that! 

Laura apparently LOVED this dish.  I think I saw her dip back in the dish about 3 times after the first time!  :o)  So I was pretty happy that she was pretty happy about her zukes! 

As a matter of fact, I think everybody rolled away from the table!  :o)  Last night’s menu included Bison Stroganoff with Whole Wheat Egg Noodles, Green Beans (courtesy of my SIL), Springs Smashed Spuds, Maple-Citrus Glazed Baby Carrots, Zucchini Gratin, Oven-Fried Green Tomatoes, Broccoli & Cheese, homemade yeast rolls with Orange Honey Butter and leftover desserts from the night before. 

So there ya go!  Go forth and pick some zukes and fresh basil and go to town!  Personally, I’ve got basil out the wazoo!  It’s growing absolutely buck wild for me this summer!  So I’ve been using it a LOT!

Enjoy!  Have a great day!  And come back and tell me what magnificent thing you made for your loves this week!

Key Lime Cheesecake

For the love of God and all that is holy, LET’S COOK!  It’s been way too long since we cooked, dangit!  I can’t even begin to tell you how busy work has been lately.  Some mornings I leave at 6:00 and I get home at 7 or 8 that night.  It’s just insane!  I’m so sorry I’ve left you all high and dry.  I’ve missed “fooding” with you everyday.  Because I love nothing better than “fooding,” that’s for sure!

So what prompted this morning’s post out of the clear blue sky?  Well, I invented a new recipe this weekend.  I went off in search of a Key Lime Cheesecake recipe.  And I didn’t find one that really cranked my tractor.  So I did the “same old, same old” New York-Style cheesecake recipe I’ve always done, but with some modifications and additions to turn it into what I wanted it to be.  And I have to tell you, it was one of the most unbelievable flavors I’ve ever tasted!  It was absolutely TO DIE FOR!!!!!!!  IF you like Key Lime that is.  The Tall Skinny Man does not because he’s a freak.  But we won’t go there.

So Key Lime Cheesecake, huh?  What made me create that?  Well, here’s the deal……….there’s 3 little French girlies visiting right now.  Three years ago, we hosted our last exchange student, Sarah, from France.  She’s currently in TN visiting and brought along 2 of her friends, Laura and Johanna.  Laura mentioned how she loves Key Lime Pie AND Cheesecake.  So I started to dream………and invent…….and create.  And VOILA!  There was this Key Lime Cheesecake!  Oh, and don’t worry!  I didn’t just pick out Laura as my favorite or anything!  Sarah got her beloved Caramel “Broonies” and Johanna got a Chocolate Chip Cookie Dough Cheesecake because she loves chocolate and had never had cheesecake before.  Oh and Unk got his beloved Honey Bun Cake too.  I was a dessert baking fool yesterday!  But I digress…….

Wanna make it?  You’ll be glad you did!  It’s amazing, if I do say so myself!

Key Lime Cheesecake

*  2.5 cups graham cracker crumbs

*  6 Tbsp. butter, softened

*  1/2 cup sugar

*  1/2 cup macadamia nuts, finely chopped

*  1/2 cup shredded coconut

*  1/4 tsp. ground cinnamon

Mix your crust in a food processor so the nuts and coconut will be ground up fairly fine and not leave lumps in the crust.  Line the bottom of a 10″ springform pan with wax paper.  This is so you can get the cheesecake off the bottom of the pan to put on a serving platter without tearing up the bottom of the cheesecake.  Now press the crust onto the bottom and 3/4 of the way up the sides of the pan.  Some folks only want crust on the bottom.  If you do, just do the bottom, but I like it up the sides too.  Bake the crust in a preheated 350° oven 15-18 minutes.  Allow to cool before adding batter.

*  4-8 oz. bars cream cheese, softened to room temperature

*  1 cup sugar

*  1/2 cup Key Lime Juice, NOT regular lime juice

*  lime zest from 3 limes  ***note at the end***

*  5 large eggs

*  5 Tbsp. flour

*  1 cup sour cream

VERY gently mix the cream cheese and sugar until well blended.  Be sure to use your mixer on a low speed.  You don’t want to whip air into this because it’s the air that causes cheesecakes to crack.  Or so they tell me anyway.  Once the cream cheese and sugar are well combined, add the key lime juice and continue mixing until it is well-combined.  Add the eggs, 1 at a time, beating after each addition to incorporate them into the batter.  Add the flour and mix until just combined.  Add zest and sour cream.  Mix until they are combined. 

Pour batter into cooled crust.  Bake 60 minutes or until the top springs back when touched.  Allow cheesecake to completely cool before releasing spring. 

***NOTE***  Now, about that zest…….zest from key limes is preferable to regular limes.  However, when you live in podunk, folks don’t realize there is a difference between regular limes and key limes.  Key limes are teeny tiny!  I couldn’t find any key limes here in podunk, so I improvised and just used the zest from regular ones for this.  If you have access to key limes, use them for zesting!

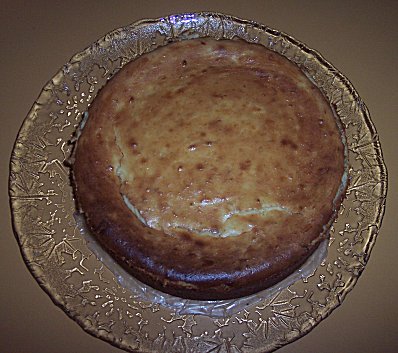
And THIS, is what you get:

Key Lime Cheesecake

Now please excuse my photography because it makes the cheesecake look burned on top, but it SOOOOOOOO was NOT!  It was an absolutely gorgeous golden color!  And as you can see, I wasn’t successful in not beating too much air into the batter because mine cracked a bit.  But it was still delightful, cracked top and all!  Oh yeah, and excuse the goofy looking snowflake Christmas platter too.  Yes, I’m aware it’s AUGUST!  But it was the first platter I came to in the cabinet and was in a hurry.  So there ya go!

OK, go forth and make some cheesecake!  Or some brownies or some cake or some something!  Enjoy!  And I’ll *try* to come back with more recipes soon!